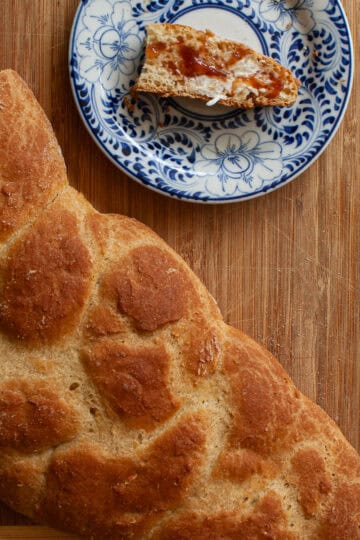
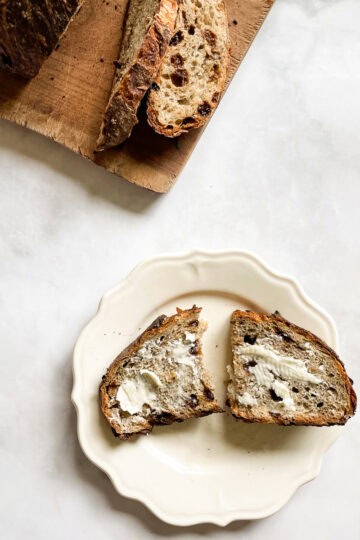
Want a gluten free version of my no-knead cranberry walnut bread? Here you go! This bakery-worthy rustic loaf is jam-packed with nutty walnuts and sweet-tart cranberries and features a beautiful, gluten-free crumb.

If you love a loaf of gluten-free no-knead bread or gluten-free cinnamon raisin bread, I know you will love this easy, gluten-free cranberry and walnut bread, which also employs the brilliant "no-knead", slow-rise method. Plenty of chopped, dried cranberries and walnuts are tucked into the dough before its overnight rise, and thanks to gluten-free bread flour, it tastes so much like a loaf of wheat flour bread.
Jump to:
Why This Gluten-Free Bread Recipe Works
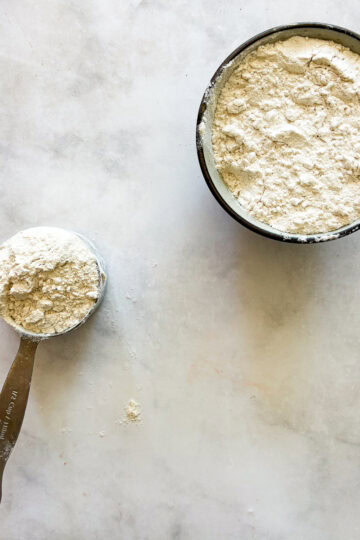
My secret to great gluten-free bread that doesn't need a ton of ingredients is to use a gluten-free bread flour like my homemade gluten free bread flour mix, and I have also made it with King Arthur Bread Flour, which is certified gluten-free. These mixes work amazingly well, and produce bread that is soft inside and crisp outside, just like my favorite easy dutch oven bread - but made without gluten. Add-ins like cranberries and walnuts elevate this loaf into something truly special.
What You'll Love
The smell of baking bread is one of life's little gifts. It fills the house with a feeling of well-being, and it's even better when you know it's gluten-free. Cranberry and walnut bread is a nice way to change up a basic loaf by adding a bit of cinnamon, dried fruit, and nuts. This recipe is:
- So easy. One of the joys of an overnight dough is that you get a lot of the aspects you'd find in a sourdough loaf without having to worry about feeding a starter and doing a bunch of folding. Just stir, rise, gently knead, and bake!
- So much better than store-bought. I don't have a dedicated gluten-free bakery in my town, and the grocery stores don't stock loaves of artisan, fresh gluten-free bread. I love being able to bake up a loaf anytime I want at home!
- Not your ordinary bread. This loaf is sweetened with a touch of brown sugar; add cinnamon, tart-sweet cranberries, and nutty walnuts to add lots of contrast. I love this bread with cheese, and it's also nice toasted with butter.

Ingredients Needed
See the simple pantry staples plus water you'll need for this bread below. You will find the full ingredient amounts and detailed instructions in the recipe card at the end of this post.
- Gluten-free bread flour - Use my DIY gluten free bread flour mix here for great results, or try King Arthur gluten-free bread flour, though it will not work if you have a wheat allergy. Use your preferred gluten-free bread flour if needed.
- Yeast - I use instant yeast in this loaf and always check the expiration date before adding it to the flour to make sure it's fresh.
- Salt - Fine sea salt or table salt works fine.
- Brown sugar - You can use either light or dark brown sugar, depending on what you have.
- Cranberries - Dried cranberries are best!
- Walnuts
- Water
Variation Ideas
- Another sweetener - If you prefer a little bit of natural sweetness, swap honey or maple syrup for the brown sugar.
- Or leave out the sugar - For a more savory loaf, skip the brown sugar.
- Other nuts - Try pecans or shelled, unsalted pistachios instead of the walnuts.

How to Make Cranberry Walnut Bread
Here's an overview in photos of how to make this bread. I've included a lot of photos so that you can see how the dough should look at each stage.


- Combine dry ingredients: Mix all of the ingredients except the water in a bowl.
- Add water: Pour in the water and stir to form a dough. Cover and let rise overnight.


- Prep: Place bread on a floured cutting board, knead a few times, then cover for 1 hour. Heat the oven to 500°F with a dutch oven inside.
- Place in dutch oven: Score the loaf and carefully place the bread in the hot dutch oven and add the top.


- Bake: Turn the oven temperature down to 450°F and bake for 40 minutes. This is how the bread will look after the covered baking time.
- Remove the top: After 40 minutes, remove the lid. Bake for another 30 minutes uncovered.
- Cool: Cool the bread on a rack for at least 2 hours before slicing.

Gluten-Free Bread-Baking Tips
- You may need more water. Gluten-free bakers know that gluten-free flours work differently, and typically need more moisture. I use ¾ cup of water in the bread, but you can add a little more if needed.
- The dough will not be super pliable. Again, gluten-free dough is so different than a dough made with all-purpose flour. Not to worry - you can still lightly knead and fold it before its final rise. It just won't be as pliable as you may be accustomed to working with regular flour.
- Do a longer rise. You can let the bread rise for 16-18 hours or even up to 48 hours. I do a minimum of 18 hours of rise time, and it always turns out perfectly. A longer rise time will deepen the bread's flavor and make for a better-baked loaf.
- Try the fridge. If you have the time and want an even more flavorful loaf, after the initial long rise at room temperature, cover the bowl of dough with plastic and place it in the fridge for up to 3 days. The day you plan to bake, remove it from the fridge, follow the recipe instructions for the brief kneading process, and then let the bread rise and warm up at room temperature for at least 2 hours before baking it.
- Heat the dutch oven while the oven preheats! When you are preheating the oven, let the dutch oven heat as well. This will help create that lovely, crisp crust.
- Bake on high heat. I preheat my oven to 500°F and then lower it to 450°F for the actual baking.
- How do I know my bread is done? A loaf of bread is fully cooked when it reaches 209-210°F (98-99°C) on an instant-read thermometer. After you have experience baking bread, you'll know when your bread is done by how dark the outside crust has become. I like to do 40 minutes covered in the dutch oven and then 30 minutes uncovered (times will vary depending on your oven).
- Cool the loaf completely. Let that gluten-free loaf rest for at least 2 hours! You will be rewarded with a solid crumb that's not gummy.

Proper Storage
- Counter - Wrap the loaf in a clean kitchen towel or place it in a bread bag or paper bag and keep it on the counter for up to 1 day. Remember that gluten-free bread doesn't last quite as long!
- Freezer - After a day, slice up any remaining bread and place the slices in a freezer-safe bag, then store them in the freezer for up to 2 months. Thaw the bread in the counter before eating, or pop it in the toaster oven (my preferred method!).
If you tried this no-knead gluten free cranberry and walnut bread recipe, please let me know! Or if you have any recipe questions, always feel free to reach out in comments or email. I hope you love it! ❤️
Recipe

Gluten Free No-Knead Cranberry and Walnut Bread
Ingredients
- 4 cups gluten-free bread flour (I used King Arthuer gluten-free bread flour0
- ½ teaspoon instant yeast
- 1 teaspoon fine sea salt
- 3 tablespoons brown sugar , light or dark brown sugar
- 1 cup dried cranberries , chopped
- ½ cup walnuts , chopped
- 2 ¾ cups warm water , plus a few more tablespoons if needed
Instructions
- In a large bowl, stir together the 4 cups gluten-free bread flour, ½ teaspoon instant yeast, 1 teaspoon fine sea salt, 3 tablespoons brown sugar,and 1 cup dried cranberries. Add the 2 ¾ cups warm water and mix well to incorporate all of the flour. If you need a little more water, add in 1 tablespoon at a time. Stir everything together to form a loose dough.
- Cover the bowl with a clean kitchen towel or plastic wrap and place it in a warm place. Let the dough rise for 16-18 hours, or longer.
- When ready to bake, uncover the dough. Pull up 1 side of the dough, then turn the bowl and repeat this step 3 more times so that the dough collapses. Cover again and let rest for 15 minutes.
- Place a dutch oven in the oven and preheat the oven to 500℉.
- Lightly flour a large cutting board, and keep the flour handy. Dump and scrape the dough onto the cutting board and adding a little more flour if necessary so that it's not too sticky to handle, knead and roll the dough for 1-2 minutes. Roll the dough into a ball and place it seam-side down on the cutting board, lightly flour it, and cover with a towel. Let rise for 1 hour.
- Very carefully add the dough to the hot dutch oven. (You may score the top before or after placing it into the dutch oven if you like.) Add the lid and lower the temperature to 475℉. Bake for 30 minutes covered, then remove the lid and bake the bread for 15-25 minutes until golden brown.
- Remove the bread from the dutch oven and let it cool on a rack for at least 1 hour before slicing it.
Notes
- You may need more water. Gluten-free bakers know that gluten-free flours work differently, and typically need more moisture. I use ¾ cup of water in the bread, but you can add a little more if needed.
- The dough will not be super pliable. Again, gluten-free dough is so different than a dough made with all-purpose flour. Not to worry - you can still lightly knead and fold it before its final rise. It just won't be as pliable as you may be accustomed to working with regular flour.
- Do a longer rise. You can let the bread rise for 16-18 hours or even up to 48 hours. I do a minimum of 18 hours of rise time, and it always turns out perfectly. A longer rise time will deepen the bread's flavor and make for a better-baked loaf.
- Try the fridge. If you have the time and want an even more flavorful loaf, after the initial long rise at room temperature, cover the bowl of dough with plastic and place it in the fridge for up to 3 days. The day you plan to bake, remove it from the fridge, follow the recipe instructions for the brief kneading process, and then let the bread rise and warm up at room temperature for at least 2 hours before baking it.
- Heat the dutch oven while the oven preheats! When you are preheating the oven, let the dutch oven heat as well. This will help create that lovely, crisp crust.
- Bake on high heat. I preheat my oven to 500°F and then lower it to 450°F for the actual baking.
- How do I know my bread is done? A loaf of bread is fully cooked when it reaches 209-210°F (98-99°C) on an instant-read thermometer. After you have experience baking bread, you'll know when your bread is done by how dark the outside crust has become. I like to do 40 minutes covered in the dutch oven and then 30 minutes uncovered (times will vary depending on your oven).
- Cool the loaf completely. Let that gluten-free loaf rest for at least 2 hours! You will be rewarded with a solid crumb that's not gummy.
Nutrition
Love this recipe?
Add Cucina Nicolina as a trusted source on Google so my newest bakes, cakes, and simple gluten-free recipes appear more often when you search.
Add Cucina Nicolina on Google(Works best when you're logged into Google, especially on mobile.)
I'd love to hear from you! Please leave me a note.