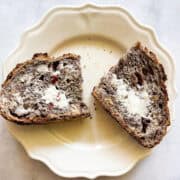
Gluten Free No-Knead Cranberry and Walnut Bread
This rustic no-knead gluten free cranberry and walnut bread is jam-packed with extras and features a beautiful, gluten-free crumb.
Servings: 10 servings
Calories: 259kcal
Ingredients
- 4 cups gluten-free bread flour (I used King Arthuer gluten-free bread flour0
- ½ teaspoon instant yeast
- 1 teaspoon fine sea salt
- 3 tablespoons brown sugar , light or dark brown sugar
- 1 cup dried cranberries , chopped
- ½ cup walnuts , chopped
- 2 ¾ cups warm water , plus a few more tablespoons if needed
Instructions
- In a large bowl, stir together the 4 cups gluten-free bread flour, ½ teaspoon instant yeast, 1 teaspoon fine sea salt, 3 tablespoons brown sugar,and 1 cup dried cranberries. Add the 2 ¾ cups warm water and mix well to incorporate all of the flour. If you need a little more water, add in 1 tablespoon at a time. Stir everything together to form a loose dough.
- Cover the bowl with a clean kitchen towel or plastic wrap and place it in a warm place. Let the dough rise for 16-18 hours, or longer.
- When ready to bake, uncover the dough. Pull up 1 side of the dough, then turn the bowl and repeat this step 3 more times so that the dough collapses. Cover again and let rest for 15 minutes.
- Place a dutch oven in the oven and preheat the oven to 500℉.
- Lightly flour a large cutting board, and keep the flour handy. Dump and scrape the dough onto the cutting board and adding a little more flour if necessary so that it's not too sticky to handle, knead and roll the dough for 1-2 minutes. Roll the dough into a ball and place it seam-side down on the cutting board, lightly flour it, and cover with a towel. Let rise for 1 hour.
- Very carefully add the dough to the hot dutch oven. (You may score the top before or after placing it into the dutch oven if you like.) Add the lid and lower the temperature to 475℉. Bake for 30 minutes covered, then remove the lid and bake the bread for 15-25 minutes until golden brown.
- Remove the bread from the dutch oven and let it cool on a rack for at least 1 hour before slicing it.
Notes
- You may need more water. Gluten-free bakers know that gluten-free flours work differently, and typically need more moisture. I use ¾ cup of water in the bread, but you can add a little more if needed.
- The dough will not be super pliable. Again, gluten-free dough is so different than a dough made with all-purpose flour. Not to worry - you can still lightly knead and fold it before its final rise. It just won't be as pliable as you may be accustomed to working with regular flour.
- Do a longer rise. You can let the bread rise for 16-18 hours or even up to 48 hours. I do a minimum of 18 hours of rise time, and it always turns out perfectly. A longer rise time will deepen the bread's flavor and make for a better-baked loaf.
- Try the fridge. If you have the time and want an even more flavorful loaf, after the initial long rise at room temperature, cover the bowl of dough with plastic and place it in the fridge for up to 3 days. The day you plan to bake, remove it from the fridge, follow the recipe instructions for the brief kneading process, and then let the bread rise and warm up at room temperature for at least 2 hours before baking it.
- Heat the dutch oven while the oven preheats! When you are preheating the oven, let the dutch oven heat as well. This will help create that lovely, crisp crust.
- Bake on high heat. I preheat my oven to 500°F and then lower it to 450°F for the actual baking.
- How do I know my bread is done? A loaf of bread is fully cooked when it reaches 209-210°F (98-99°C) on an instant-read thermometer. After you have experience baking bread, you'll know when your bread is done by how dark the outside crust has become. I like to do 40 minutes covered in the dutch oven and then 30 minutes uncovered (times will vary depending on your oven).
- Cool the loaf completely. Let that gluten-free loaf rest for at least 2 hours! You will be rewarded with a solid crumb that's not gummy.
Nutrition
Calories: 259kcal | Carbohydrates: 54g | Protein: 3g | Fat: 4g | Saturated Fat: 0.5g | Polyunsaturated Fat: 3g | Monounsaturated Fat: 1g | Sodium: 238mg | Potassium: 46mg | Fiber: 2g | Sugar: 13g | Vitamin A: 4IU | Vitamin C: 0.1mg | Calcium: 20mg | Iron: 0.3mg