This cute gluten free Easter bunny cake will delight everyone at the table! A tender and buttery cake is baked in a classic bunny mold and finished with a creamy layer of fluffy frosting for a festive centerpiece.

A vanilla-scented gluten free butter cake forms the base of this cute easter bunny cake that's baked in a bunny cake tin for festive flair (try a gluten free vanilla buttermilk cake instead for a slightly different flavor). A pink buttercream frosting is the perfect finishing touch! Don't forget the jelly beans - my kids especially love this part :) If you don't need to keep gluten-free, you can make this cake using my butter cake recipe.
Jump to:
Why This Gluten-Free Easter Bunny Cake Works
My homemade gluten free flour blend is perfect in this cake, keeping prep easy and baking up beautifully every time. The key to gluten-free cakes is to bring the ingredients like butter, eggs, and milk to room temperature so that they blend seamlessly into the batter, so don't skip this step.
What You'll Love
Like bunny bread, easter bunny cake is a special treat I bake for my family every spring - it's a tradition! From simplicity comes a fork-tender, butter cake that's almost too adorable to eat. You'll love this bunny cake's:
- Ease of prep and ingredients. You'll see from the ingredients in the next section that this cake is made from pantry and fridge staples; nothing fancy is needed.
- Super cuteness. What can I say? I love making seasonally appropriate goodies! I bought this cake tin when my youngest was a toddler, and I love dressing up the bunny cake with colored frosting, jelly beans, and even mini chocolate eggs.
- Kid-friendliness. Yes, adults love this cake, too. But even though my girls are a bit older, they still appreciate the magic of a shaped cake. It just feels so special. And, it's made with kid-friendly flavors like butter, vanilla, and sugar.

Ingredients Needed
Here's a look at the simple ingredients you'll need to bake this cake. Make sure to scroll down to my recipe card at the bottom of this post for the full ingredient amounts and instructions!
- Gluten-free flour - I use my homemade gluten free flour blend here, and you can use any 1:1 baking blend of your choice. If you want to make this cake with all-purpose flour, use 1 ½ cups of flour.
- Baking powder
- Salt
- Butter - You'll need unsalted butter in the cake and for the frosting.
- Granulated sugar
- Eggs - I used large eggs.
- Milk - I prefer whole milk for richness, and 2% milk also works.
- Powdered sugar - Always sift the sugar before adding it to the frosting to remove any lumps!
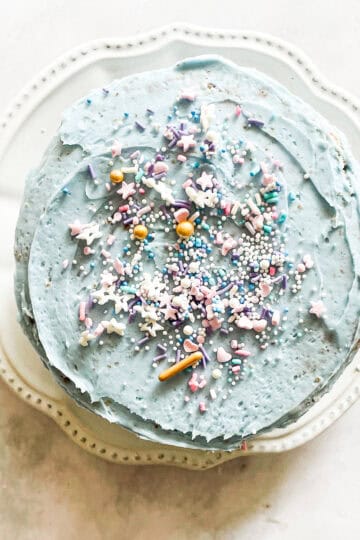
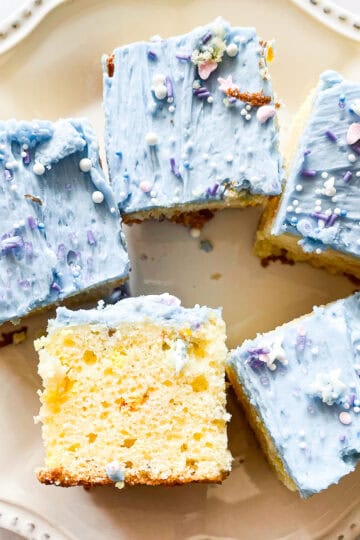
- Food coloring - I like the natural food coloring powder, but any food coloring will work. You can do any color of your choice - yellow or blue is also nice.

Decorating Tips
- Swirl the frosting - Make decorative swirls with an offset spatula to make this cake really stand out.
- Jelly beans for eyes - My oldest likes to add a jelly bean for the bunny's eye right before serving. You can also use colorful jelly beans to add a border around the edges of the cake.
- Mini eggs - Place chocolate mini eggs around the base of the bunny cake on the cake platter, or go all out and scatter them across the surface of the cake!
- Shredded coconut - Sprinkle sweetened or unsweetened coconut over the top of the cake for a bit of color contrast and texture.

Step-by-Step Instructions
Here's an overview in photos of how to make this easter bunny cake recipe:

1. Mix dry ingredients: In a bowl, whisk together the dry ingredients.

2. Make batter: Separately, cream the butter and sugar, then add the eggs, and beat in the flour mixture alternating with the milk.

3. Add to pan: Grease your bunny mold, then pour in the batter. Rest for 20 minutes.

4. Bake: Place in a 350F oven or bake according to your pan's directions and bake for 30-40 minutes.

5. Make frosting: Sift the sugar into a bowl with the butter, and beat until creamy.

6. Add color: Beat in the food coloring, then frost the cooled cake.

Tips & Recipe Notes
- Bring ingredients to room temperature. This is always important, but especially regarding the frosting, so that it turns out smooth and fluffy. Make sure the butter is soft enough so that it easily blends with the other ingredients.
- Bake according to your tin's directions. Shaped baking tins can be a bit different than regular cake pans. Some call for you to bake the cake at a lower temperature. Always follow the instructions that come with the cake tin!
- Make this a regular cake. If you wish, bake this cake in a 9-inch round, parchment-lined cake pan to make a traditionally-shaped cake. Then decorate with festive Easter candies and figurines! Or, double the recipe and bake as a big, 9x13-inch sheet cake.
- Rest the batter. Leave enough time before baking to allow the batter to rest in the cake tin. This ensures that the gluten-free flour mix properly hydrates, making for a smooth, plush crumb with no grittiness.
Proper Storage
- Fridge - Cover the cake with foil and store it in the fridge for up to 5 days. Let the cake come to room temperature for 20 minutes before serving.
- Freezer - Refrigerate the cake to firm up the frosting, then wrap the cake in foil and store it in the freezer for up to 2 months. Thaw the cake completely in the fridge before serving.
More Fun Cake Recipes
Happy baking! If you make this gluten free easter bunny cake recipe, I'd love to know. Please leave a comment below, reach out with any questions, and tag me on Instagram @Cucina Nicolina ❤️
Recipe

Gluten Free Easter Bunny Cake
Ingredients
- 1 ¾ cups homemade gluten free flour blend (210 grams)
- 1 ½ teaspoons baking powder
- ⅛ teaspoon salt
- ½ cup unsalted butter, at room temperature
- 1 cup granulated sugar
- 2 eggs, lightly beaten
- ½ cup whole milk
Frosting
- ½ cup unsalted butter
- 3-4 cups powdered sugar
- 4 drops red food coloring or more if needed
- 1 tablespoon milk
Instructions
- Preheat the oven to 350℉. Grease both pieces of a bunny cake mold and set aside.
- In a small bowl, whisk together the 1 ¾ cups homemade gluten free flour blend, 1 ½ teaspoons baking powder, and ⅛ teaspoon salt.
- In a large bowl and using an electric mixer on medium speed, cream the ½ cup unsalted butter,, scraping down the sides of the bowl as necessary, until the butter is lighter in color, about 45 seconds. Then add the 1 cup granulated sugar in a steady stream and mix on medium speed until the mixture is very light in color and texture, about 4 to 5 minutes.
- Slowly pour in the 2 eggs, a little at a time, and beat very well for about 2 minutes.
- With the mixer on low, add half of the flour mixture, then the ½ cup whole milk, and finish with the remaining flour. Scrape down the sides of the bowl in between additions.
- Pour the batter into prepared cake pan and rest it for 20 minutes. Place the top on the cake pan and place on a baking sheet, then bake for 30-40 minutes, or until a tester inserted in the center comes out clean.
- Remove from the oven and set on a rack to cool for 10 minutes then turn out onto rack to finish cooling completely.
- Make frosting: In a large bowl, beat the ½ cup unsalted butter until light and fluffy. Add the 3-4 cups powdered sugar, the 4 drops red food coloring, and 1 tablespoon milk and continue mixing until a smooth frosting forms. Frost the top and sides of the cooled cake.
Notes
- Bring ingredients to room temperature. This is always important, but especially regarding the frosting, so that it turns out smooth and fluffy. Make sure the butter is soft enough so that it easily blends with the other ingredients.
- Bake according to your tin's directions. Shaped baking tins can be a bit different than regular cake pans. Some call for you to bake the cake at a lower temperature. Always follow the instructions that come with the cake tin!
- Make this a regular cake. If you wish, bake this cake in a 9-inch round, parchment-lined cake pan to make a traditionally-shaped cake. Then decorate with festive Easter candies and figurines! Or, double the recipe and bake as a big, 9x13-inch sheet cake.
- Rest the batter. Leave enough time before baking to allow the batter to rest in the cake tin. This ensures that the gluten-free flour mix properly hydrates, making for a smooth, plush crumb with no grittiness.
Nutrition
Love this recipe?
Add Cucina Nicolina as a trusted source on Google so my newest bakes, cakes, and simple gluten-free recipes appear more often when you search.
Add Cucina Nicolina on Google(Works best when you're logged into Google, especially on mobile.)
I'd love to hear from you! Please leave me a note.