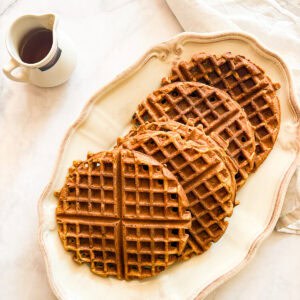
Warmly spiced and naturally gluten-free pumpkin waffles are just what you want on a crisp fall morning!

Homemade oat flour waffles or gluten free waffles on a cool October morning are the ultimate in comfort food. Now, add pure pumpkin puree and a trio of cozy spices, and you're in for a memorable breakfast. I love serving pumpkin waffles throughout fall, and you'll find me sipping on a hot cup of coffee whilst liberally dousing my waffles in maple syrup.
I add a bit of brown sugar to the batter to lightly sweeten the waffles, and you could easily swap it for maple syrup to keep the vibe extra cozy. I like whole grain oat flour here, though a gluten-free 1:1 flour blend also works, or you could try another single-origin gluten-free flour (more suggestions in the ingredient notes). Waffles are one of my favorite breakfasts, and they keep well for later, too.
Jump to:
Why Make These?
I love waffles for so many reasons, not least of all because they don't require any flipping (oat flour pancakes, while also beloved, are more time-intensive for me)! These are so special, with plenty of creamy, mellow pumpkin to make them stand out. They usher in the change of the season in the very best way.
- Full of pumpkin flavor. In fall, make all the pumpkin things. I certainly love to tuck it into recipes whenever possible! Loads of pure pumpkin puree flavor these waffles, along with cinnamon, ginger, and nutmeg, for a lovely autumnal treat.
- Perfect for a fall brunch. Serve these for a special occasion -- although of course they are welcome any day of the week! But I love these as part of a brunch spread that's accompanied by, of course, lots of hot coffee and fall sunshine.
- Easy. Another recipe that doesn't need any fancy ingredients, which is always welcome in my book. All the basics are here, including milk and eggs, so you may already have everything you need on hand.
- Simply gluten-free. But I promise you won't be able to tell! Oat flour comes to the rescue again to keep things simple and wheat-free.
For more oat flour inspiration, browse all my oat flour recipes.

Ingredients Needed
Simple ingredients make up these waffles! Make sure to scroll down to my recipe card at the bottom of this post for the full ingredient amounts and instructions.
- Gluten free flour - I use oat flour here, and a gluten-free flour blend, like my homemade gluten free flour blend, also works. Or, try brown rice flour.
- Brown sugar - Either light or dark brown sugar works.
- Leavening - Baking powder and baking soda (check to make sure they're fresh!).
- Spices - A combo of ground cinnamon, ginger, and nutmeg.
- Salt - Use fine sea salt or table salt.
- Eggs - I used large eggs.
- Pumpkin puree - Make homemade pumpkin puree or use pure pumpkin puree from a can. Note: NOT pumpkin pie mix, which is already sweetened and spiced.
- Butter - I always use unsalted butter.
- Milk - Any milk works here, including whole, 2%, or non-dairy milk.

Step-By-Step Instructions
Here's an overview in photos of how to put together this waffle batter:

1. Make dry mix: In a large bowl, whisk together the dry ingredients.

2. Mix wet ingredients: In a small bowl, mix together the wet ingredients, including the pumpkin.

3. Combine and rest: Mix the wet ingredients into the dry ingredients and rest the batter for 15 minutes.

4. Cook: Heat a waffle iron, then cook the waffles.
Baking Tip: Rest the Batter
I always let the batter for waffles and pancakes rest for at least 15 minutes, regardless of whether it's a gluten-free batter or not. This helps the flour to absorb moisture (especially important in gluten-free recipes), which in turn leads to a fluffier waffle. I find that 15-20 minutes is just fine. If your batter is a tad thick, you can stir in a few tablespoons of milk to help it become more pourable.

Tips & Recipe Notes
- Rest the batter overnight. You can even let the waffle batter rest overnight in the fridge to deepen the flavor and allow the batter to really hydrate. If you try this, place the batter in an airtight container and store it in the fridge. You may need to loosen it up with a few tablespoons of milk if it's become very thick.
- What setting? I like to cook my waffles on the waffle iron's highest setting to make sure they are fully cooked inside and slightly crisp on the outside.
- What size? I like to make my waffles using a ⅓ or ½ cup measure, but you can make them as large or small as you like.
- How long to cook waffles? Cook the waffles until the light changes to green and there's no more steam coming off the top of the machine. This might mean you need to cook the waffles a bit longer after the light changes.
Add milk. Gluten-free flour absorbs more liquid than all-purpose flour. You can add a little more milk, 1 tablespoon at a time, if you find that the batter is too thick to add to the waffle iron. - Make dairy-free. Make waffles dairy-free by substituting non-dairy butter for the butter, your favorite non-dairy milk for the milk, and non-dairy yogurt for the yogurt.
- Swap coconut oil. I like to substitute the butter with unrefined or refined coconut oil for a change. The waffles are just as buttery and tender.

Serving Suggestions
- Maple syrup - And melted butter, please! For a classic finish to waffles.
- Caramel - My homemade salted caramel sauce was absolutely MADE to be drizzled over these waffles. It adds a special (and autumnal) touch to any breakfast.
- Whipped cream - For a decadent breakfast, top your waffles with lightly sweetened, softly whipped cream.
- Nut butter - I love a waffle spread with almond or peanut butter.
- Persimmons - Slice up a ripe persimmon, or add a dollop of persimmon jam or persimmon puree to a stack of waffles.
Storage Options
- Fridge - Place waffles in a sealable bag or airtight container with a piece of parchment paper in between each one so that they don't stick, and store them in the fridge for up to 5 days.
- Freezer - Store waffles (with a piece of parchment in between each one) in a freezer-safe, sealable bag in the freezer for up to 3 months.
- To Reheat - You can pop waffles straight from the fridge or freezer into a toaster or toaster oven and heat until lightly crisp.
More Gluten Free Pumpkin Recipes


Happy baking! If you make this recipe, I'd love to know. Please leave a comment below, reach out with any questions, and tag me on Instagram @Cucina Nicolina ❤️
Recipe
Gluten Free Pumpkin Waffles
Ingredients
- 2 ¼ cups oat flour or gluten free flour (280 grams)
- ½ cup light or dark brown sugar
- 2 teaspoons baking powder
- 1 teaspoon baking soda
- 2 teaspoons ground cinnamon
- ½ teaspoon ground ginger
- ¼ teaspoon ground nutmeg
- ¼ teaspoon fine sea salt
- 3 large eggs
- 1 cup pure pumpkin puree
- ¼ cup unsalted butter melted
- 1 ½ cups milk
Instructions
- In a large bowl, whisk together the 2 ¼ cups oat flour or gluten free flour, ½ cup light or dark brown sugar, 2 teaspoons baking powder, 1 teaspoon baking soda, 2 teaspoons ground cinnamon, ½ teaspoon ground ginger, ¼ teaspoon ground nutmeg, and ¼ teaspoon fine sea salt.
- In a medium bowl, lightly beat the 3 large eggs, then whisk in the 1 cup pure pumpkin puree, ¼ cup unsalted butter, and 1 ½ cups milk. Stir the wet mixture into the dry ingredients and let the batter stand for 15 minutes.
- Heat the waffle iron on the highest setting. Then, when the batter has rested, scoop ¼ cup of batter into the iron, close the lid, and cook until done. Repeat until all the batter has been used up.
Notes
- Rest the batter. I always let the batter for waffles and pancakes rest for at least 15 minutes, regardless of whether it's a gluten-free batter or not. This helps the flour to absorb moisture (especially important in gluten-free recipes), which in turn leads to a fluffier waffle. I find that 15-20 minutes is just fine. If your batter is a tad thick, you can stir in a few tablespoons of milk to help it become more pourable.
- Rest the batter overnight. You can even let the waffle batter rest overnight in the fridge to deepen the flavor and allow the batter to really hydrate. If you try this, place the batter in an airtight container and store it in the fridge. You may need to loosen it up with a few tablespoons of milk if it's become very thick.
- What setting? I like to cook my waffles on the waffle iron's highest setting to make sure they are fully cooked inside and slightly crisp on the outside.
- What size? I like to make my waffles using a ⅓ or ½ cup measure, but you can make them as large or small as you like.
- How long to cook waffles? Cook the waffles until the light changes to green and there's no more steam coming off the top of the machine. This might mean you need to cook the waffles a bit longer after the light changes.
Add milk. Gluten-free flour absorbs more liquid than all-purpose flour. You can add a little more milk, 1 tablespoon at a time, if you find that the batter is too thick to add to the waffle iron. - Make dairy-free. Make waffles dairy-free by substituting non-dairy butter for the butter, your favorite non-dairy milk for the milk, and non-dairy yogurt for the yogurt.
- Swap coconut oil. I like to substitute the butter with unrefined or refined coconut oil for a change. The waffles are just as buttery and tender.
Helen SPiridakis says
Nice photos and nice post.....always a pleasure to read your blog!