Sweet and summery gluten free peach pie is bursting with fresh, juicy fruit and a touch of warming cinnamon, all tucked into a flaky gluten free crust.

If you're lucky enough to have a peach tree in your backyard, I envy you! We planted a few trees last year, but they are still in their infancy, so we are waiting until they are productive enough to give us more than a few beautiful, firm-fleshed peaches to tuck into pie. Fortunately, a neighbor had more than they could use so I was the lucky recipient of fragrant, rosy peaches that I immediately chopped up and folded into a gluten free peach pie.
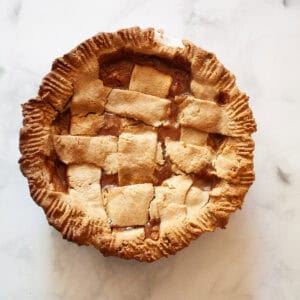
This is a simple recipe for peach pie, calling for a peach filling that's lightly sweetened and tossed with a little lemon juice, tapioca flour for thickening, and just a hint of cozy cinnamon. The gluten free, all-butter crust is unbelievably flaky and holds up well to being rolled, cut, and latticed to make a pretty topping for the pie. (You can use the crust for other pie recipes, too.) Serve warm slices of gluten free peach pie, plain or with a little vanilla ice cream - a true celebration of summer's bounty.
Jump to:
Gluten Free Peach Pie Is:
- Packed with summer flavors
- Beautifully simple
- Highlighted by a gorgeously flaky gluten free crust
- The best use of fresh peaches!


Ingredient Notes
Here's what you'll need for gluten free peach pie. The full ingredient amounts and instructions are in the printable recipe card at the end of this post.
For the Crust
- Oat flour - Whole grain, naturally gluten free oat flour is a great choice in pie crusts because it creates a sturdy yet tender crust that rolls out well.
- Arrowroot - A little bit of arrowroot, a starchy gluten free flour, adds extra flakiness to the dough. You can omit it if you like and add 3 additional tablespoons of oat flour, or substitute cornstarch.
- Granulated sugar - A hint of sugar adds sweetness to the pastry dough.
- Salt - I always use fine sea salt in my recipes. A good substitute is table salt.
- Butter - Use cold, unsalted butter in the crust.
- Ice water - Have the ice water ready to go when you start to make the crust.
For the Filling
- Peaches - Peel, pit, and chop the peaches into chunks. Use ripe peaches for the best, juiciest peach flavor.
- Granulated sugar - For a different flavor note, substitute ½ cup of honey for the sugar.
- Tapioca flour - A gluten free starchy flour, tapioca flour helps gel the filling so it's not too goopy.
- Lemon juice - Fresh lemon juice is a must!
- Cinnamon - Ground cinnamon adds a touch of warming spice. You can use ground ginger instead if you like.
- Butter - An extra few tablespoons of butter are dolloped on top of the filling before the top crust is added. You can skip this if you wish.
- Milk - A little whole milk is brushed on top of the lattice crust to encourage a crisp, browning layer.
Can I Use Frozen Peaches?
In my opinion, fresh peaches are best for making peach pie. Pie is a dish that makes the most of seasonal fruit, and this recipe showcases peaches that are pulled straight from the tree. However, if you must (sob!), you can use frozen peaches. If possible, purchase frozen peaches that are already peeled and cut into chunks. I don't recommend using canned peaches because they are already soft enough and will get way too mushy when baked into a pie.

How to Make Peach Pie
Here's an overview of what you'll need to do to put together this peach pie.


- Make the crust: In a large bowl, whisk the flour, sugar, and salt.
- Add butter: Cut in the butter with a fork.


- Add ice water: Drizzle in the ice water 1 tablespoon at a time.
- Form dough: Lightly squeeze the dough into a ball.


- Chill dough: Separate the dough into two equal balls, wrap them in plastic, press them into discs, and chill them in the fridge for at least 30 minutes.


- Make the filling: In a large bowl, mix the chopped peaches with the granulated sugar, tapioca flour, lemon juice, and cinnamon.
- Add to crust: Roll out one of the dough discs into a circle 12 inches in diameter, then fit the dough into a pie pan. Pour the filling into the crust.
- Heat oven: Preheat the oven to 425°F. Place a large baking sheet on the bottom oven rack to catch drips from the pie.


- Make the top crust: Remove the other disc dough from the refrigerator and roll it into a 12-inch diameter circle and cut it into strips. Thread the strips over and under each other on the top of the pie, crimp the sides, and brush with milk.
- Bake: Place the pie in the oven and bake it at 425°F for 20 minutes, then reduce the temperature to 375°F and continue baking for 1 hour.
- Cool: Cool the pie on a rack for 3-4 hours before serving.

Recipe Tips
As noted, you can swap honey for the sugar in the filling, or try ginger in place of or in addition to the ground cinnamon to add more flavor to the filling. A few more tips outlined below will help you achieve peach pie perfection:
- Use fresh peaches! If I'm lucky enough to receive peaches from my neighbor, I make sure to use them right away in pie or cake. Fresh in-season peaches give the best flavor to pie, so use those if you can. Make sure the peaches are ripe but not mushy, with no brown spots.
- Don't peel the peaches. I get it - sometimes it's too much work to peel your peaches, whether by peeler or the water bath method, especially if the peaches are very ripe. I will often just leave the skins on and my pie is just as delicious.
- Use another pie crust. If you wish, use my oat flour pie crust recipe here instead of the pie crust included in the recipe card. Or, use your favorite gluten free or regular pie crust recipe and pair it with the filling.
- Do a double-crust pie. I LOVE the look of a lattice crust on top of fruit pie, and it solves my predicament of answering the question "Do I actually love pie crust?" It's a lighter pie crust and I adore seeing the filling peek through the interwoven strands. However, if you like a full top crust go right ahead! Instead of cutting the top crust into pieces, simply roll it out, fit it on the top of the pie, crimp the sides, cut a few vent holes, and bake as the recipe instructs.
- Make the dough ahead. You can prepare the pie dough and store it in the fridge for 3 days.
- Use a pie shield. This pie has a long baking time, and although I don't typically have issues with the crust browning too quickly, if you find that the longer bake time is cooking the crust too much you can make a little cover for the crust. First, cut a 14-inch square of aluminum foil and fold it in half. Cut out a 5-inch semi-circle on the folded edge then unfold. Carefully fit the aluminum foil over the pie crust edges, leaving the center of the pie exposed.
- Make it vegan. Swap your favorite vegan butter for the butter and skip brushing the milk on the top crust.

Homemade Gluten Free Pie Crust: Doable and Delicious!
Don't be intimidated by making a gluten free pie crust - with the right combination of flours (or single flour, like in my oat flour crust linked above), you'll get a pie crust that's nearly indistinguishable from its wheat flour counterpart.
For the best, flakiest results, use cold butter and ice water. This means that you should remove the butter from the fridge just before you work it into the flour mixture. Also, make up your ice water before you start making the dough so that the water is nice and cold when you add it in.
The dough should be thoroughly chilled in the fridge before you roll it out, at least 30 minutes and preferably up to 2 hours. Don't roll out the dough too thinly so that it has a sturdy structure when you fit it into the pie dish. And, keep the second dough ball cold in the fridge until you are ready to roll it out.
Also, butter your pie dish! This will help the slices easily remove when you cut and serve the pie (when I forget to do this little step I sorely regret it because it truly does make a difference). For the top crust, for the best and easiest cuts, keep the dough cold until you roll it out and cut the pieces for the lattice. If you find that the lattice is too soft, you can form it back into a ball and roll it out again, or place it back in the fridge for a few minutes to chill.

Storage Options
Pie freezes well and you can freeze a whole baked pie or individual slices if you have leftovers. Sometimes I'll make a double batch of pie, enjoy a warm, sweet slice now, and save the second pie for when I'm expecting company. Here's how to properly store your pie in a few different ways:
- Counter - Loosely cover the pie with foil and store it on the counter for one day.
- Fridge - Cover the pie with foil and store it in the fridge for up to 3 days.
- Freezer - Wrap the cooled, baked pie in a layer of plastic and a layer of foil and freeze it for up to three months. Thaw the pie overnight in the fridge before serving or reheating.
- To Reheat - Place the pie in a 350°F oven until warm.
Recipe
Gluten Free Peach Pie
Ingredients
For the Crust
- 2 ½ cups oat flour (320 grams)
- 3 tablespoons arrowroot (30 grams)
- 2 tablespoons granulated sugar
- ½ teaspoon fine sea salt
- ¾ cup unsalted butter, cold
- 1 cup ice water
For the Filling
- 3 pounds peaches, peeled, pitted, and chopped
- ⅔ cup granulated sugar
- 3 tablespoons tapioca flour
- 1 tablespoon lemon juice
- ½ teaspoon ground cinnamon
- 2 tablespoons unsalted butter, chopped, optional
- 1 tablespoon whole milk
Instructions
Make the Crust
- In a large bowl, whisk the flours, sugar, and salt. Cut in the butter with a fork, then drizzle in the ice water 1 tablespoon at a time until the dough holds together when lightly squeezed. Separate the dough into two equal balls, wrap them in plastic, press them into discs, and chill them in the fridge for at least 30 minutes.
Make the Filling
- In a large bowl, mix the chopped peaches with the granulated sugar, tapioca flour, lemon juice, and cinnamon together until thoroughly combined. Place the filling in the fridge until you're ready to assemble the pie.
Assemble
- Preheat the oven to 425°F. Place a large baking sheet on the bottom oven rack to catch drips from the pie. Butter a 9-inch pie pan.
- Dust a surface with oat flour and roll out one of the dough discs, keeping the second one in the fridge until you're ready to roll it out. Roll the dough into a circle 12 inches in diameter. Carefully fit the dough into the buttered dish. Pour the filling into the crust and dot it with the butter if using.
- Remove the other disc dough from the refrigerator and roll it into a 12-inch diameter circle. Cut out strips of dough to make a lattice crust (6-8 strips). Thread the strips over and under each other on the top of the pie, then use your fingers to seal the strips to the edges of the bottom crust. Use a fork to make crimps around the edge of the pie. Brush the crust with 1 tablespoon of whole milk.
- Place the pie in the oven and bake it at 425°F for 20 minutes, then reduce the temperature to 375°F and continue baking until the crust is firm and lightly browned and the filling is bubbling, about 1 hour.
- Remove the pie from the oven and cool on a rack for 3-4 hours before serving.
I'd love to hear from you! Please leave me a note.