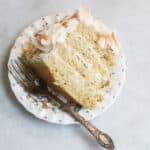
Gluten Free Coconut Pineapple Cake
This incredibly decadent gluten free coconut pineapple cake features tender cake, sweet pineapple filling, whipped cream, and coconut.
Servings: 16 servings
Calories: 563kcal
Ingredients
Make Cake
- 3 ½ cups homemade gluten free flour blend (420 grams)
- 3 teaspoons baking powder
- ¼ teaspoon salt
- 1 cup unsalted butter, at room temperature
- 2 cups granulated sugar
- 4 eggs, lightly beaten
- 1 cup whole milk
Pineapple Filling
- 1 28-ounce can crushed pineapple in unsweetened juice
- 2 tablespoons arrowroot
- ¼ cup granulated sugar
Whipped Cream Frosting
- 3 cups heavy cream
- ½ cup powdered sugar, sifted
- 2 cups toasted unsweetened coconut flakes
Instructions
Cake
- Grease and line the bottom of two 9-inch round cake pans with circles of parchment.
- In a small bowl, whisk together the flour, baking powder, and salt.
- In a large bowl and using an electric mixer on medium speed, cream the butter, scraping down the sides of the bowl as necessary, until the butter is lighter in color, about 45 seconds. Then add the sugar in a steady stream and mix on medium speed until the mixture is very light in color and texture, about 4 to 5 minutes.
- Slowly pour in the eggs a little at a time, and beat very well for about 2 minutes.
- With the mixer on low, add the flour mixture in four doses, alternating with the milk in three doses. Scrape down the sides of the bowl in between additions.
- Divide the batter evenly between the prepared cake pans. Preheat the oven to 350℉ and let the batter rest while it heats, up to 30 minutes. Place the cake in the oven and bake for 25 to 30 minutes, or until a toothpick inserted in the center comes out clean.
- Remove from the oven and set on a rack to cool for 10 minutes then turn out onto rack to finish cooling completely.
Make Filling
- In a heavy saucepan over medium heat, combine the pineapple, sugar, and arrowroot. Stir well to combine and bring to boil. Reduce heat and simmer until thick. Remove from heat and let cool completely.
Make Frosting
- Place the cream in a bowl and sift over the powdered sugar. Beat with an electric mixer on medium speed until medium-stiff peaks form.
Assembly
- You may cut each cake layer in half or keep the layers whole. If you make a 4-layer cake, spread ⅓ of the pineapple filling over the bottom layer, and top it with a few spoonfuls of whipped cream. Top with cake, and repeat until the pineapple is used up. Spread the cake with the remaining whipped cream, covering the top and sides completely. Liberally sprinkle coconut over the top and sides of the cake.
Notes
Tips
- Bring ingredients to room temperature - For most baking recipes, bringing the ingredients to room temperature helps them to incorporate better into the batter. This is especially helpful with butter! Leave the ingredients on the counter at least 15 minutes before you use them, and check that the butter is soft enough by gently pressing into it - it should feel soft to the touch.
- Rest that batter - Always rest a gluten free batter. Up to 30 minutes is ideal, or use the time that the oven preheats if you're short on time. This allows the flour to hydrate, an important step.
- About the whipped cream - You're going for a sweet spot of firm-ish but not super thick. The whipped cream should be spreadable but not goopy. I keep it very simple in this cake by using lightly sweetened whipped cream both in the filling and to frost the cake, and it holds up well but do note that it is slightly different than a firmer buttercream frosting. If the whipped cream seems too thin, keep beating it until it gets to a more spreadable state.
- Bake cake a day in advance: If you can, plan to bake the cake rounds a day before assembling the cake. This will allow the crumb to firm and set a bit, making for easier cutting, filling, and frosting. Wrap the layers in foil or plastic and keep them in the fridge until you assemble the whole cake.
- Make the filling in advance: You can also make the pineapple filling a day in advance and store it in a glass jar with a tight-fitting lid in the fridge until you're ready to use it. I don't recommend making the whipped cream in advance - it's best to make it just before you finish assembling the cake.
- Assembly tips: You may cut each cake layer in half or keep the layers whole (I prefer the look and taste of a layered cake but you do you). If you make a 4-layer cake, spread ⅓ of the pineapple filling over the bottom layer, and top it with a few spoonfuls of whipped cream. If just doing two layers, use all of the pineapple filling in the middle layer.
- Use gluten free flour - Swap your favorite 1:1 gluten free flour for the DIY flour blend. Note that my blend doesn't contain xanthan gum so your cake may turn out a bit differently if you use a blend that contains gums.
Nutrition
Calories: 563kcal | Carbohydrates: 56g | Protein: 7g | Fat: 37g | Saturated Fat: 24g | Polyunsaturated Fat: 2g | Monounsaturated Fat: 8g | Trans Fat: 0.5g | Cholesterol: 124mg | Sodium: 155mg | Potassium: 143mg | Fiber: 4g | Sugar: 36g | Vitamin A: 1.095IU | Vitamin C: 0.4mg | Calcium: 123mg | Iron: 2mg