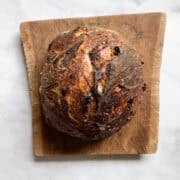
Gluten Free Cinnamon Raisin Bread (No Knead Recipe)
Easy no knead gluten free cinnamon raisin bread benefits from a long overnight rise and a bake in a hot Dutch oven. It's studded with raisins and sweetened with brown sugar and cinnamon.
Servings: 10 servings
Calories: 226kcal
Ingredients
- 4 cups gluten-free bread flour (I like King Arthur Gluten-Free Bread Flour)
- ½ teaspoon instant yeast
- 1 teaspoon fine sea salt
- 3 tablespoons brown sugar
- 1 tablespoon ground cinnamon
- 1 cup raisins
- 2 ¾ cups warm water , plus a few more tablespoons if needed
Instructions
- In a large bowl, stir together the 4 cups gluten-free bread flour, ½ teaspoon instant yeast, 1 teaspoon fine sea salt, 3 tablespoons brown sugar, 1 tablespoon ground cinnamon, and 1 cup raisins. Add the 2 ¾ cups warm water and mix well to incorporate all of the flour. If you need a little more water, add in 1 tablespoon at a time. Stir everything together to form a loose dough.
- Cover the bowl with a clean kitchen towel or plastic wrap and place it in a warm place. Let the dough rise for 16-18 hours, or longer.
- Place a dutch oven in the oven and preheat the oven to 500℉.
- Lightly flour a large cutting board with gluten-free flour, and keep the flour handy. Dump and scrape the dough onto the cutting board and add a little more flour if necessary so that it's not too sticky to handle. Knead and roll the dough for about 6 turns. Roll the dough into a ball and place it seam-side down on the cutting board, lightly flour it, and cover with a towel. Let rise for 1 hour.
- Very carefully add the dough to the hot Dutch oven. (You may score the top before or after placing it into the Dutch oven if you like.) Add the lid and lower the temperature to 455℉. Bake for 40 minutes covered, then remove the lid and bake the bread for 20-25 minutes until golden brown.
- Remove the bread from the Dutch oven and let it cool on a rack for at least 2 hours before slicing it.
Notes
- Let it really rise. This bread needs a long, slow rise. I let my loaf rise for a minimum of 16 hours, and you can let it go for up to 2 days. The longer rise time will deepen its flavor and make for a better-baked loaf.
- Keep in a warm place. Try to let the bread rise in a warm place—I admit this is not always possible for me because our house can be cool, especially in the winter. I keep it near the oven, which is a warmer spot. Or, place it in a sunny spot to encourage its rise.
- Knead in the raisins. I've noticed that the raisins can stick out a bit during the rise. Even though this is a "no-knead recipe," a small bit of folding and kneading the dough is helpful, both to incorporate the raisins and get the dough ready for the oven.
- Try the fridge. If you have the time and want an even more flavorful loaf, after the initial long rise at room temperature, cover the bowl of dough with plastic and place it in the fridge for up to 3 days. The day you plan to bake, remove it from the fridge, follow the recipe instructions for the brief kneading process, and then let the bread rise and warm up at room temperature for at least 2 hours.
- Heat the Dutch oven while the oven preheats. Place the Dutch oven in the oven while it preheats so that it gets nice and hot. This will help create that lovely crackly crust.
- Bake on high heat. I preheat my oven at 500°F and then lower it to 450°F for the actual baking.
- How do I know my bread is done? A loaf of bread is fully cooked when it reaches 209-210°F (98-99°C) on an instant-read thermometer. After you have experience baking bread, you'll know when your bread is done by how dark the outside crust has become. I like to do 40 minutes covered in the dutch oven and then 20 minutes uncovered (times will vary depending on your oven).
- Cool the loaf completely. It's SO hard not to tear into a warm, freshly baked loaf of bread as soon as it comes out of the oven, but I urge you to wait at least 1 hour, preferably 2. This allows the starches to set and solidify, especially important when baking with gluten-free flour.
Nutrition
Calories: 226kcal | Carbohydrates: 54g | Protein: 3g | Fat: 0.5g | Saturated Fat: 0.1g | Polyunsaturated Fat: 0.02g | Monounsaturated Fat: 0.03g | Sodium: 241mg | Potassium: 134mg | Fiber: 2g | Sugar: 4g | Vitamin A: 2IU | Vitamin C: 1mg | Calcium: 17mg | Iron: 0.5mg